
The Splitwise API is here! With it, any developer can create an app that interacts with a Splitwise account, just like Facebook or Twitter.
Have you ever wished Splitwise had a certain feature so bad that you would be willing to build it yourself? Now you can!
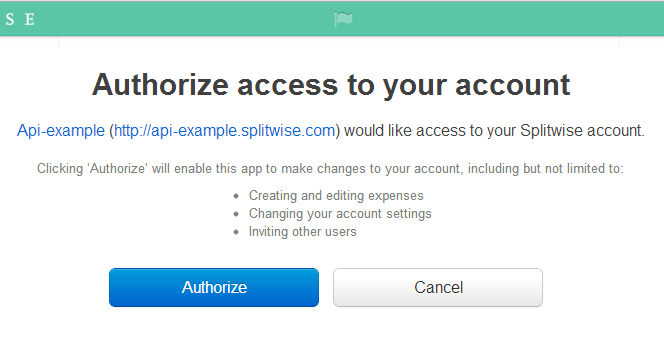
In order to use the Splitwise API, you need to ask users to OAuth into their Splitwise account. To demonstrate how this works, I created a simple 3rd party Ruby on Rails application that enables users to graph monthly expenses by category or keyword search. The example app pulls a user’s data, runs some calculations, and presents the results in a series of charts. You can follow this article step-by-step to learn how to get set up on OAuth for Rails, and I’ll point out some common pitfalls. For a guide, you can also find the code for the app on my github.
OAuth is an open protocol that allows users to give apps access to data in their account without giving the app their credentials. If you haven’t heard of it, I recommend reading about it here and here.
OAuth works in three steps. When you register your application with Splitwise, your application will receive a hash called a consumer key. Then, whenever your app tries to access a user’s data, it will send its consumer key to Splitwise and receive a request token. Your app will use this request token to direct the user to a page on Splitwise’s site where they can authenticate. Once the user authenticates, Splitwise will send your app an access token that will provide the app with access to the user’s account data. Whenever your app requests data, it must sign its request with the access token.
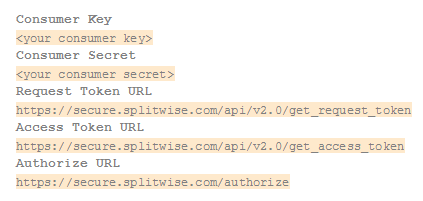
To get OAuth running, you first need a Splitwise account (you can sign up easily at splitwise.com). Then, you need to register your application and receive a consumer key here. Don’t worry about what to put for the homepage and callback urls; you can change them later by logging into http://dev.splitwise.com. Once you fill in the form you should see something like the image at left, with a consumer key and consumer secret.
To organize this information in your Rails app, and to keep it all in one place for when you want to edit it later, create the file config/application.yml in your application’s directory and write the following in it YAML:
 SPLITWISE_API_KEY: <your consumer key>

SPLITWISE_API_SECRET: <your consumer secret>

SPLITWISE_SITE: "https://secure.splitwise.com"

SPLITWISE_AUTHORIZE_URL: "/authorize"

SPLITWISE_REQUEST_TOKEN_URL: "/api/v3.0/get_request_token"

SPLITWISE_ACCESS_TOKEN_URL: "/api/v3.0/get_access_token"
Now install the gem oauth-plugin by including it in your Gemfile and running bundle install. With oauth-plugin working, you can access it from your app through the module OAuth. In the following code I’ll write the minimum Ruby necessary to send a request to a user’s Splitwise account. The program lacks structure and organization; the structure of your real app will conform to your purpose. To see an example of a structured app, you may refer to my example app—in particular, the file controllers/user_controller.rb. There you’ll find most of the logic that uses OAuth.
Time to code. First, create an OAuth consumer. You can accomplish this with the method OAuth::Consumer:
 def consumer

@c ||= OAuth::Consumer.new(ENV["SPLITWISE_API_KEY"], ENV["SPLITWISE_API_SECRET"], {

:site => ENV["SPLITWISE_SITE"],

:scheme => :header,

:http_method => :post,

:authorize_path => ENV["SPLITWISE_AUTHORIZE_URL"],

:request_token_path => ENV["SPLITWISE_REQUEST_TOKEN_URL"],

:access_token_path => ENV["SPLITWISE_ACCESS_TOKEN_URL"]

})

end
The idiom @c ||= frees you from worrying about when the consumer is created. You can simply always access it through the variable-like method consumer. Next, have oauth-plugin create a request token:
request = consumer.get_request_token
You can now access the token as request.token and the secret as request.secret. Use the request to forward your users to page where they can authenticate. For example, you can use the rails method redirect_to:
redirect_to request.authorize_url
Once the user has authenticated, Splitwise will redirect them to the URL you specified for “Callback URL” when you registered your application. I’ll assume that you created a Rails method in the controller to handle the redirection and that you have access to the object params containing the parameters of the request.
The following uses OAuth::RequestToken to generate an access token:
 request_token = OAuth::RequestToken.new(consumer, params[:oauth_token], request.secret)

access = request_token.get_access_token(:oauth_verifier => params[:oauth_verifier])

access_token = OAuth::AccessToken.new(consumer, access.token, access.secret)
Armed with an access token, you can now send requests, access the user’s data, and mess with their account—insofar as the API allows. The API also provides a minimal request used for testing. As an experiment, you can try it out with these two lines:
 response = access_token.get('https://secure.splitwise.com/api/v3.0/test')

body = response.body
If it works, you’re using OAuth!

I am in fact delighted to read this weblog posts which
contains plenty of valuable data, thanks for providing such statistics.
Very rapidly this web page will be famous amid all
blogging and site-building users, due to it’s pleasant articles or reviews